6 inch Chocolate Cake Recipe

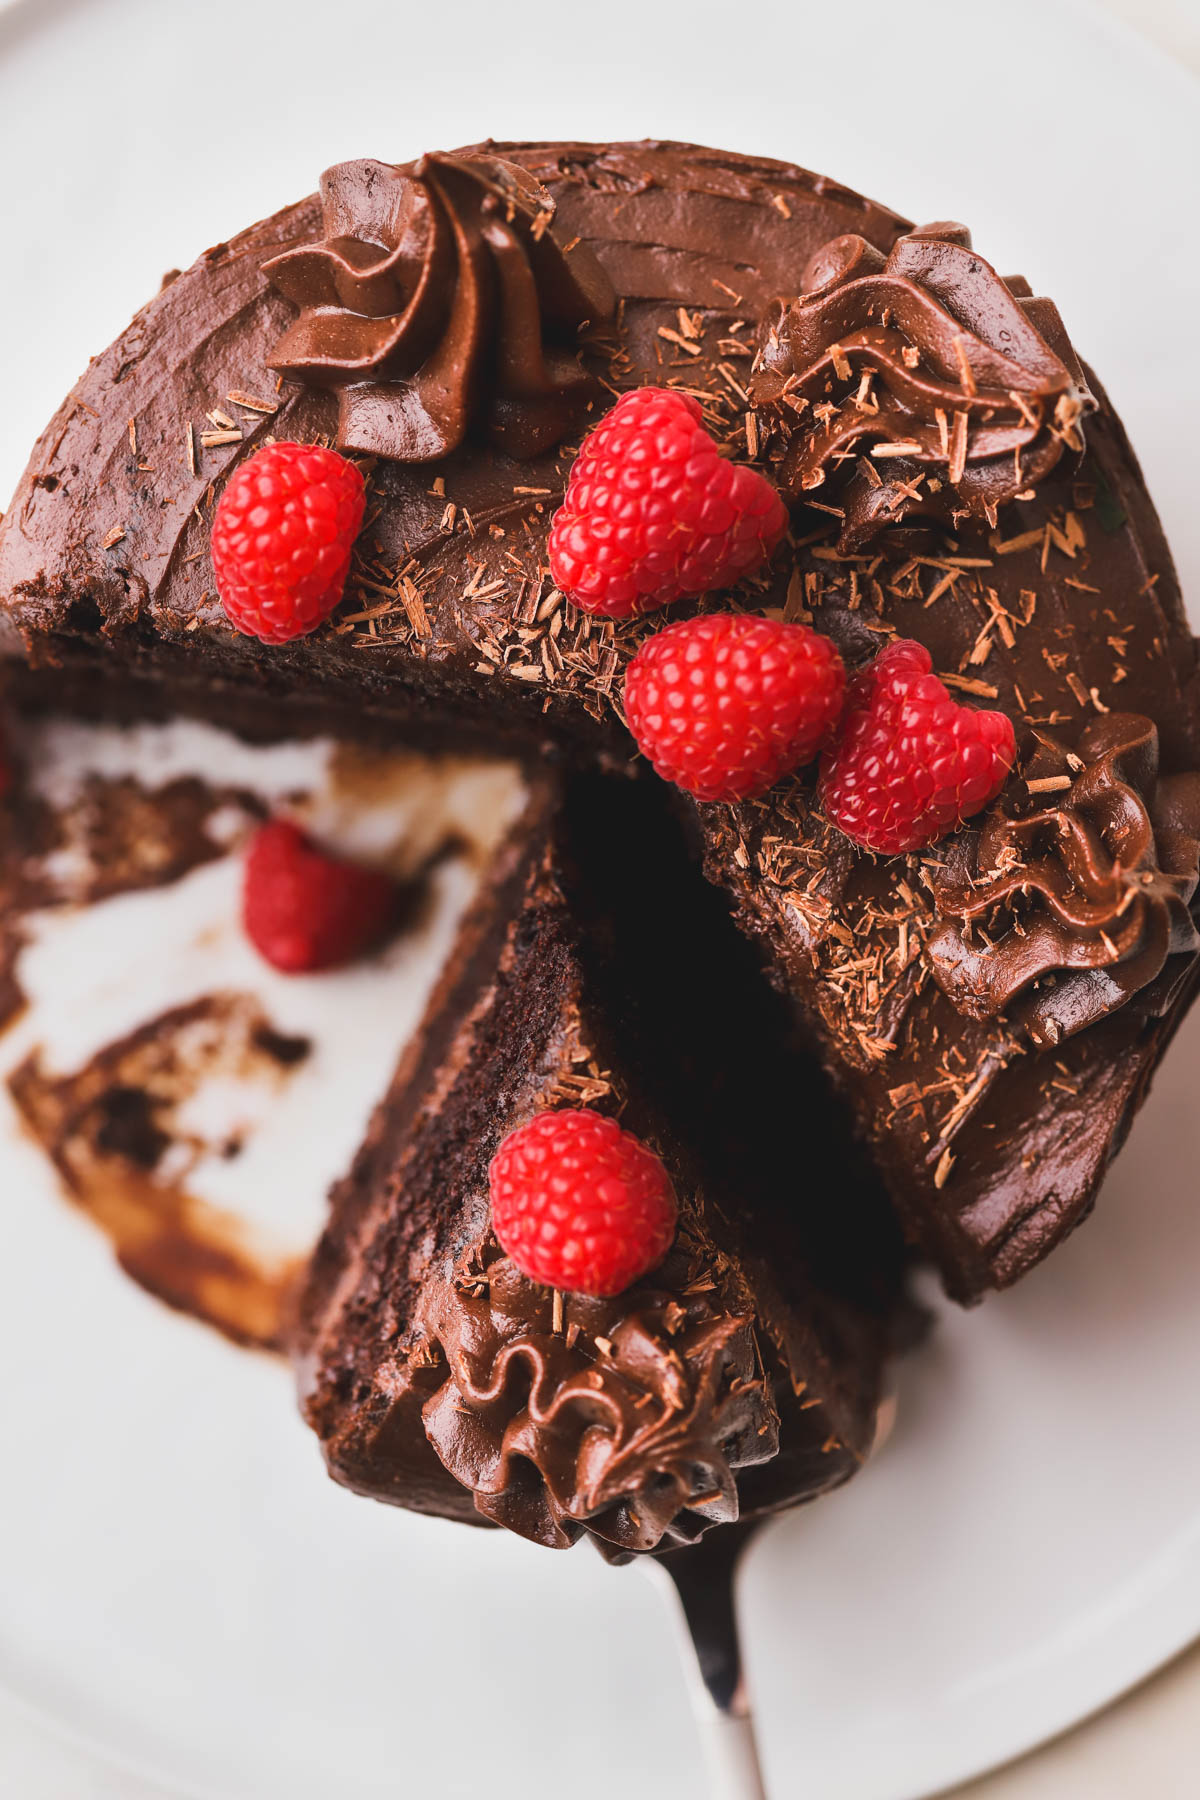
This three layer 6 inch Chocolate Cake Recipe is the perfect cake for celebrations like Valentine’s Day, date night, or anniversaries. Layers of devil’s food cake, sandwiched in between luscious chocolate cream cheese and shaved chocolate on top.

Sometimes, we just want a cake without a ton of leftovers. This 6 inch Chocolate Cake Recipe is perfect for two or smaller gatherings. The chocolate cake is moist, decadent, fudgy and bursting with chocolatey flavor.
The chocolate cream cheese is made with dutch process cocoa powder and has an intense chocolate flavor without being too sweet. It is guaranteed to please any chocolate lover!
Interested in more chocolate desserts, make sure to try my Rich and Fudgy Peanut Butter Cup Brownies and Black Forest Cake Ice Cream.
Why You Will Love This Chocolate Cake Recipe
- Moist chocolate cake- This recipe is made with moist devil’s food cake. Each layer is baked separately in its own pan, which helps the cake bake evenly and maintain its super soft texture. You can make it 3 layers like I did, or if you want thicker cake layers, bake them in two pans.
- Chocolate cream cheese frosting- I created a frosting that combines both butter and cream cheese. It’s rich and bold and isn’t overly sweet like other frostings.
- Easy to make- This cake does not require a mixer and can easily be made inside one bowl. You can decorate it however you like and serve with with fresh strawberries or raspberries.
- Perfect for smaller occasions- This cake serves 8 generous portions which makes it great for smaller birthdays, Valentine’s Day or even when you’re craving chocolate and do not want a ton of leftover cake.

Ingredient Notes
Below are ingredient notes. For the complete list and quantities, please refer to the recipe card located at the bottom of the page.
- Cocoa powder- I recommend using dutch process cocoa powder which has a very bold and intense chocolate flavor. This is the one I use.
- Oil- I use canola oil but you can also use vegetable oil.
- Eggs- Use large eggs and make sure they are at room temperature for 2 hours before mixing your cake.
- Buttermilk- Use full fat or reduced fat. Pull from the refrigerator 2 hours before baking.
- Vanilla extract- Use pure vanilla extract for the best flavor. You can also use vanilla bean paste.
- Hot water- Make sure it is steaming hot. Adding hot water helps the cocoa to “bloom” and bring out the chocolate flavor.
- Butter- Use unsalted butter and leave it out at room temperature to soften.
- Cream cheese- Use full fat cream cheese and let it soften at room temperature for a few hours before mixing.
- Powdered sugar- Always sift your powdered sugar to remove any clumps.
Step By Step Instructions
STEP 1: Prepare pans. Spray and line 3 (6 inch) cake pans with parchment paper. I line the sides, as well as the bottom.
STEP 2: Sift dry ingredients. First, sift together flour, sugar, cocoa powder, baking soda, and salt in a large bowl.


STEP 3: Mix wet ingredients. Next, mix together oil, buttermilk, egg, and vanilla extract in a measuring cup or small bowl.
STEP 4: Combine wet and dry ingredients. Pour wet ingredients into dry ingredients. Then, use a whisk to combine. Do not over mix.
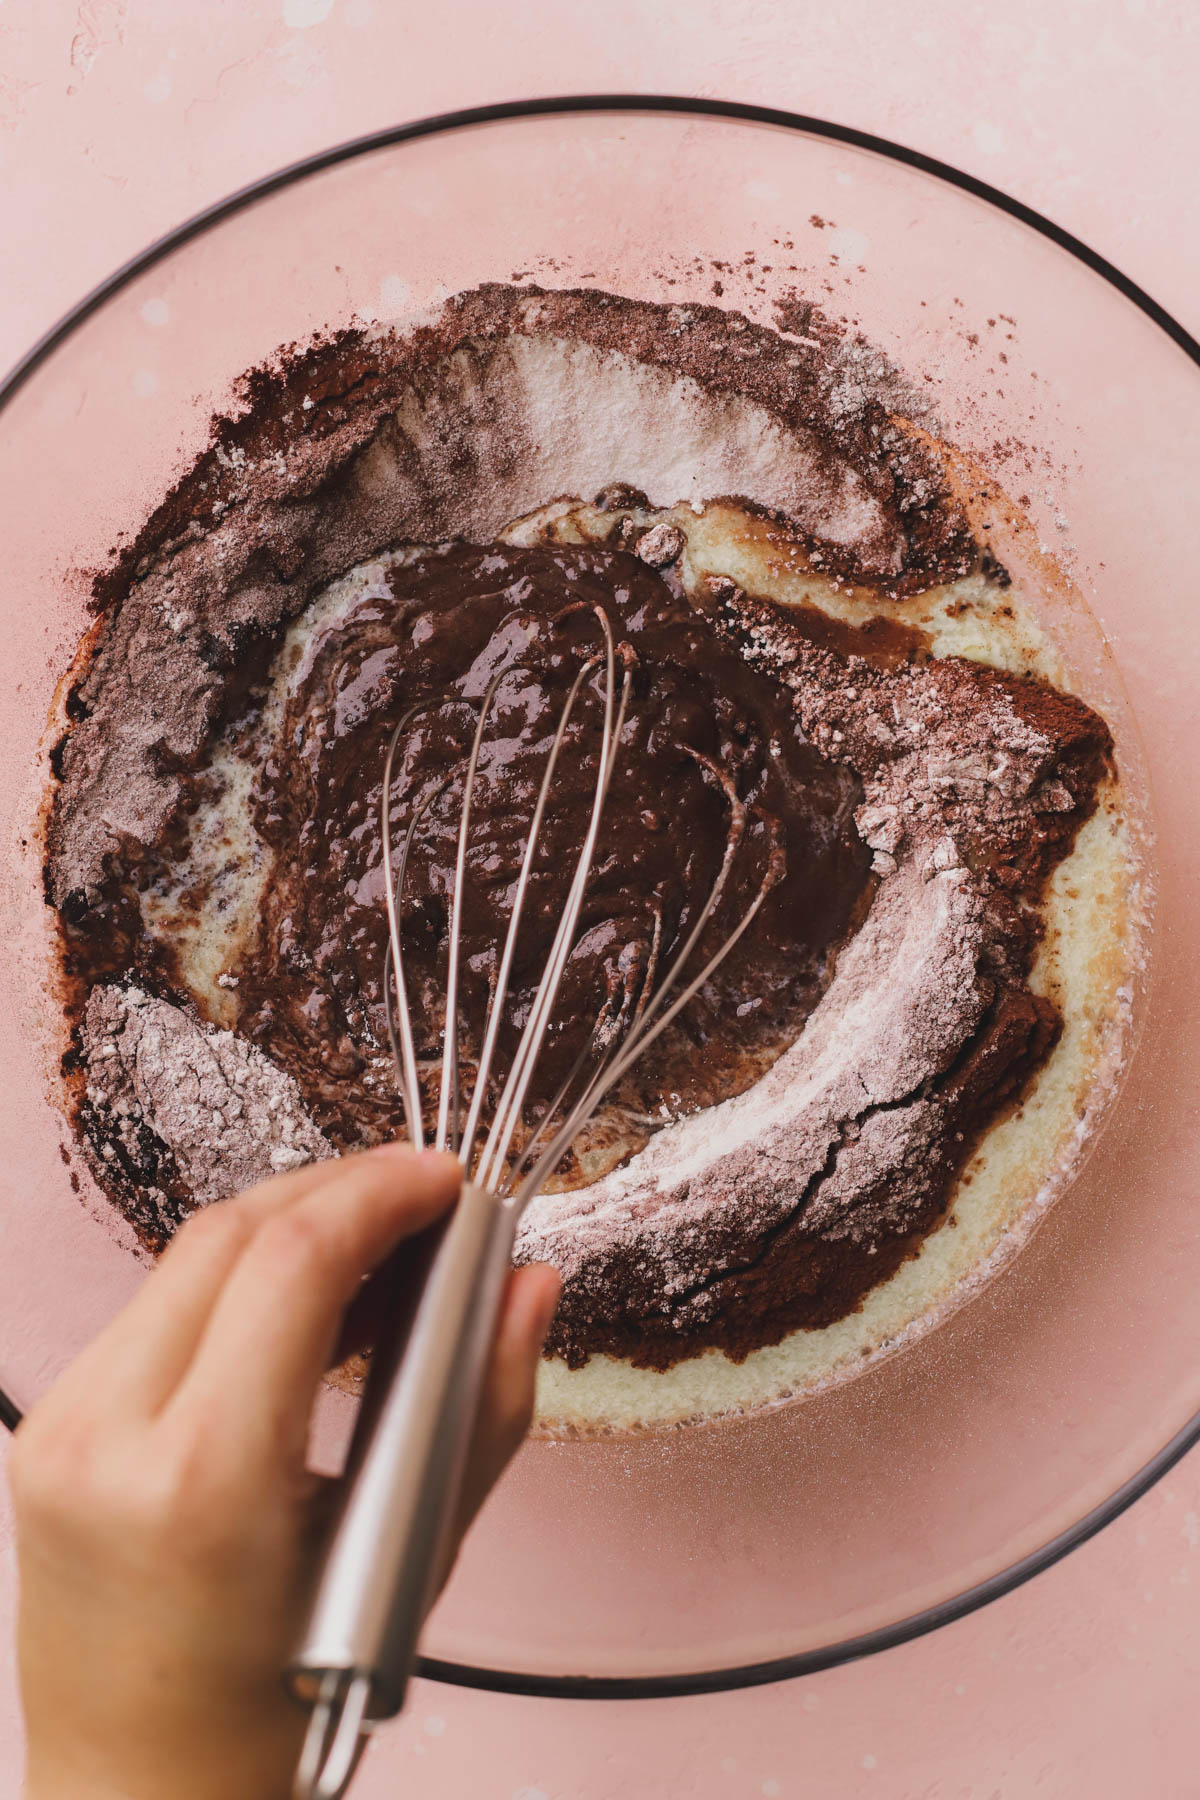

STEP 5: Add hot water. Heat water until steaming. Carefully whisk hot water into cake mixture. Whisk until smooth.
Then, pour batter into cake pans. I use an ice cream scoop to divide the batter evenly among the pans. You can also use a scale to be more accurate.
STEP 6: Bake cake. Inside a 350°oven, bake cakes for 18-20 minutes or until a toothpick is inserted and comes out clean.


Let the cakes cool completely before removing from the pan. If the centers of the cake are uneven, I use a serrated knife to level them off. This will help make frosting a lot easier.
STEP 7: Make frosting. Inside a bowl, add softened cream cheese and butter. Sift powdered sugar, cocoa powder, and salt.


Then, use a hand mixer to beat the ingredients together until smooth. Scrape down the sides of the bowl with a rubber spatula. Next, add vanilla and mix one more time to combine.
Assembling The Cake
Here are some tips on how to assemble a layered cake.
- Items needed in assembling a cake: Turn table, serrated knife or cake leveler, off set spatula, cake icing tip, and cake scraper.
- Remove the cooled cakes from the pan. Use a cake leveler or serrated knife to level them if needed.
- Spread a small amount of frosting onto your cake plate. Place the first layer of cake down. Add a small amount of frosting onto the cake. I use a medium size ice cream scoop so that each layer has the same amount of frosting.
- Use an offset spatula to spread evenly.
- Place the second layer of cake on top. Repeat with frosting.
- Lastly, add the third layer of cake with the bottom of the cake facing up. This will give you a flat base when decorating.
- At this point, you can crumb coat the cake or if you feel comfortable, completely cover the cake with frosting. Use Wilton 1M tip to pipe rosettes on top.

Expert Baking Tips
When measuring, make sure to spoon and level your flour. Do not scoop the flour from the canister. This will yield too much flour and cause your cake to be dry. Always use the scoop and level method.
Make sure to use room temperature ingredients. Cold ingredients can ruin the texture in your batter, as well as create lumps inside your frosting. Having room temperature ingredients mix up more smoothly and beautifully.
Sift your dry ingredients. Sifting is essential in baking for a couple of reasons. One, it removes any clumps that could ultimately show up in your finished cake, and it helps evenly mix each dry ingredient before you incorporate the wet ingredients
Use dutch process cocoa powder. Trust me, it makes a big difference in taste and the appearance. This type of cocoa powder produces a bold and intense chocolate flavor. It also gives a dark, rich color to the final cake.
Don’t skip the salt inside the cake or the frosting. Adding a touch of salt enhances the chocolate flavor.
Frequently Asked Questions
Yes! Wrap the cooled cake layers tightly in plastic wrap and store them at room temperature for up to 2 days. You can whip up the frosting and store in an airtight container in the fridge for up to 5 days. Use a hand or stand mixer to re-whip the frosting until it’s fluffy and easy to spread.
Yes, you can. If you want thicker cake layers, use two 6 inch pans. Adjust the baking time as needed.
The key to keeping these cakes moist is to not over bake them, which can happen very quickly if you leave them in the oven too long. A good way to determine if the cake is finished is by simply inserting a toothpick in the center of each cake. Another way is to gently press on the center of the cake. If it springs back, it’s done.
This cake pairs beautifully with many different frostings. Swiss meringue buttercream, American buttercream, cream cheese frosting, and chocolate ganache are all great options.
Use an ice cream scoop to scoop the batter into the baking pans, or weigh the batter to divide it equally between pans. Then, level the layers with a serrated knife or a cake leveler after baking.

Storing and Freezing
This 6 inch Chocolate Cake Recipe is best kept at room temperature. Store it under a cake dome or inside a cake carrier. You can also refrigerate it for up to 5 days.
Freezing
To store unfrosted cake layers, wrap them with plastic wrap. Then, wrap them with aluminum foil to keep them moist and fresh. Freeze for up to 30 days. Thaw cake layers inside the refrigerator or on the counter at room temperature for 1 hour.
To freeze frosted cake, place uncovered cake inside the freezer for 1 hour to help set the frosting. Then, wrap the entire cake with two layers of plastic wrap, followed by a layer of aluminum foil. Freeze for up to 1 month. To thaw, place cake inside refrigerator overnight or leave at room temperature for a few hours.
More Dessert Recipes


Try These Delicious Chocolate Recipes Too!
- Andes Chocolate Mint Brownies
- Triple Chocolate Muffins
- Chocolate Fudge Cupcakes
- Cinnamon Chocolate Chip Cookies
- Chocolate Chip Marshmallow Cookies
After trying out this recipe, I’d love to hear your feedback. Please consider leaving a comment below. Don’t forget to tag me on Instagram and follow me on Pinterest for more mouthwatering recipes. Your support is greatly appreciated!

6 Inch Chocolate Cake Recipe
Ingredients
- 1 cup All purpose flour, spooned and leveled, sifted
- 1 cup White granulated sugar
- 1/4 cup+2 Tbsp Cocoa powder, dutch process, sifted
- 1 tsp Baking soda
- 1/2 tsp Salt
- 1 Large egg, room temperature
- 1/2 cup Canola oil
- 1/2 cup Buttermilk, room temperature
- 2 tsp Vanilla extract
- 1/2 cup Hot water
Chocolate Cream Cheese Frosting
- 8 oz Cream cheese, softened
- 1/2 cup Butter, unsalted, room temperature
- 3 cups Powdered sugar, sifted
- 3/4 cup Cocoa powder, sifted
- 1/4 tsp Salt
- 1 tsp Vanilla extract
Instructions
- Preheat oven to 350°.
- Spray and line 3 (6 inch) cake pans with parchment paper. I line the sides, as well as the bottom.
- First, sift together flour, sugar, cocoa powder, baking soda, and salt in a large bowl.
- Next, mix together oil, buttermilk, egg, and vanilla extract in a measuring cup or small bowl.
- Pour wet ingredients into dry ingredients. Then, use a whisk to combine. Do not over mix.
- Heat water until steaming. Carefully whisk hot water into cake mixture. Whisk until smooth.
- Pour batter into cake pans. I use an ice cream scoop to divide the batter evenly among the pans. You can also use a scale to be more accurate.
- Bake cakes for 18-20 minutes or until a toothpick is inserted and comes out clean.
- Let the cakes cool completely before removing from the pan. If the centers of the cake are uneven, I use a serrated knife to level them off. This will help make frosting a lot easier.
Chocolate Cream Cheese Frosting
- Inside a bowl, add softened cream cheese and butter. Sift powdered sugar, cocoa powder, and salt directly over the bowl.
- Then, use a hand mixer to beat the ingredients together until smooth. Scrape down the sides of the bowl with a rubber spatula. Next, add vanilla and mix one more time to combine.
Assemble
- Place the first layer of cake down. Add a small amount of frosting onto the cake.
- Use an offset spatula to spread evenly.
- Place the second layer of cake on top. Repeat with frosting. Lastly, add the third cake layer with the bottom of the cake facing up.
- At this point, you can crumb coat the cake or if you feel comfortable, completely cover the cake with frosting. Use Wilton 1M tip to pipe rosettes on top.
- Top with shaved chocolate, mini chocolate chips, or chocolate sprinkles. Serve with fresh raspberries.
Notes
- When measuring, make sure to spoon and level your flour. Do not scoop the flour from the canister. This will yield too much flour and cause your cake to be dry. Always use the scoop and level method.
- Make sure to use room temperature ingredients. Cold ingredients can ruin the texture in your batter, as well as create lumps inside your frosting. Having room temperature ingredients mix up more smoothly and beautifully.